Monday, October 30, 2017

Disaster Preparedness for Families

Hi mamas and friends,

disaster preparation

I attended a disaster training recently and wanted to share some of the things I learned. We live in Southern California, so some of these things may be more Earthquake centric.

In this post I cover:
~Overview notes
~Things to do in the event of an emergency
~What to stock for your emergency supplies
~Fire proof safe
~Create a family disaster plan
~Earthquake Tips
~General Fire Safety
~Gas, Water and Electricity
~Preventative maintenance things to do around your home
~Classes to take
~Other disasters

~Overview notes~ 
~ For any disaster, be prepared to be on your own for 5 days with water, food, supplies etc.
~ Always know the escape route of any place you are at. Try to look for two escapes
~ I.c.e. In case of emergency phone numbers. Keep an emergency list, medical information and key identification on your phone ~ Daylight savings. Use this opportunity as a reminder to - change batteries for carbon monoxide smoke detectors. Change batteries for all items twice a year. Update your flashlight batteries.
~Identify an out of state contact that everyone calls in the event of a disaster. Try to memorize this number. Signals might be jammed for calling local numbers but may be able to call outside to another state.
~ If you have children, what are their school emergency plans?

~ In the event of an emergency~
1) Remain calm. Take a deep breath.

2) Check for injuries. 

3) Listen to the radio.

4) Evacuate if advised. (If you don't, the first responders need to use their resources to evacuate you instead of fighting a fire, for example).

5) Check your meters in your home.

6) Shut off utilities (See Gas, Water, Electricity section below)

7) Clean up spilled chemicals

8) Secure pets.

9) Call out of state family contact.

10) Check on neighbors and stay away from downed lines. Anytime you see wires down, consider them charged.

11) Drive or stay away from an emergency - this causes more work for first responders and people trying to help the situation

~Stock an Emergency/Kit Supplies -

Put somewhere you can gain access easily. Garage or somewhere accessible by two ways.

1) First and foremost, if you don't have time to put together an emergency kit, We bought the 4 person survival kit. I also bought the 4 person backpack kit for my car.

2) Radio, if not included in your emergency kit

3) Battery Operated Lanterns (if not included in your emergency kit) instead of candles (sometimes may cause fires)

4) Children's or elderly's medicine: For those with little ones, add some children's motrin and/or tylenol and a thermometer to your kit. Extra diapers and wipes, onesies, clothes.

5) Water, One gallon per day per adult.

6) Clothing, shoes and supplies near bed (even in a hotel too). Sturdy shoes (in case glass shatters, your feet will be protected).
7) Flashlights/Whistle near bed

8) Hide unopened package of glow sticks between mattress and box spring

9) Can opener for food

10) Pet food/water

11) Fire extinguisher

12) Gloves

13) Glasses

14) Blankets or sleeping bag for each person

15) Hand sanitizer

16) Cold packs


~Fire proof safe~
Place for important documents.
1) Passports

2) Identification

3) Titles

4) Cash, keep smaller bills - when there is an emergency, some of the system at the stores or atms will go down so you may not be able to use credit cards or withdraw money. If you are at the store and they might not have change for large bills.

5) Other legal documents


~Create a Family disaster plan~

1) Identify a meeting place outside of your home for everyone to meet in case you cannot communicate

2) Identify escape routes for your home

3) Who will get the kids? Pets?

4) Identify a "shelter place" in your home. A safe, accessible room, sealed windows, away from windows.

5) Make sure everyone knows where the emergency supplies kit is.


~Earthquake Tips ~ 
~Make sure everyone is ok. Don't run outside when it's shaking. Before you charge outside, assess outside. If there is fire nearby don't go outside. Use your judgement. Don't run out during actual event.

~Stay away from windows.

~Take cover under a strong structure. Cover your head and hold onto the structure.

~Avoid books or anything over your head near your bed or desk.

~Strap things down. Use L brackets to hold all of your furniture to the wall. Secure anything over your bed. Glass and mirrors and implode and move your bed away from the windows.The wire hangers aren't secure enough for mirrors/paintings on wall.

~Doorways are safest but put your foot in your doorway so it doesn't hit you in your face.
~If you are sleeping in the middle of the night. Hide on the floor next to the bed. Roll out on the floor and take all of your blankets next to your bed and cover up.
~Prepare flashlights and glowsticks by your bed

~Stay away from downed power lines. Assume they are charged.

~Stay away from large structures, 100 feet away from building.

~Run outside of the parking structure. Stay away from hazards while you are exiting.

~Assess the safety of where you are. Is it better to be outside or inside?

~General fire safety~

1) If your pan is on fire, cover the pan with the lid. 2nd thing is to use baking soda. Don't put water, salt or flour on it. Could cause a flash fire.
2) Fire extinguisher as long as the pressure needle is full. Every few months you have to invert and then fluff the powder. They can last a long time. As soon as you use it you have to replace it.

3) Fire. You hear the fire alarm, evacuate right away. Get out of the building immediately.

4) If someone tells you to evacuate, please do. If you stay and then end up needing to be rescued, you are taking the first responders away from helping someone in need or fighting the fire.

5) If you live in a 2 story place, buy a fire escape ladder. They sell the kind of ladder that goes out about 4-6 inches from the wall so that is supposed to be easier to climb down. Can keep it right under your bed. To use it: Open your window. Remove screen deploy and climb down. Can also do a practice drill and Carry baby in pouch and have your child grab your chest and shoulders. Bind him to you and then take them down. They do have three story fire ladders.

6) Do a practice run. Exit drills in home. For the fire escape ladder, go downstairs and practice climbing up a ladder. Make everyone comfortable.


~Gas, Water and Electricity~
~Turn off gas valve at your house. - DO NOT turn on the gas valve by yourself. Only the professionals should turn it back on.

~Gas meter
Usually outside on the side of the garage. if you have subterranean parking, probably in that area.

1) Purchase a non-sparking utility wrench to be able to turn off and on the gas valve.

2) Can't stress the importance of carbon monoxide detectors - Carbon monoxide is colorless and odorless.

3) If you come outside to your meter, it smells, turn it off. If meter is spinning or it smells, turn it off.

4) If the valve is parallel then it's on. If it's horizontal, it's off. Don't turn it back on yourself. This is the only utility you have to let the professionals turn back on.

5) Exercise your valve. If you can't move it and it's stuck call gas company to have them loosen or replace it.

~Water shut off main - this one you can turn off and on by yourself

Water shut off main. In the street parkway down by the street. Has a lid and cement cover. Bring gloves, can be dirty in there.

1) Buy a T hammer wrench. $20. Put on valve and turn it a quarter turn. In line, parallel, it's on. Horizontal it's off.

2) Turn water back on gradually. Righty tighty left loosely. Open things slowly because pipes can break.

3) Shut off your water if you leave your house for more than one day.


~Electrical panels

Shut off the circuit breaker. Can kill all of the power by shutting it off.

1) Turn your power off if you aren't sure. Don't mess with the seal. It's high voltage.

2) Turn it off slow, don't shut off the main first. Shut off all the little guys first and then the main line.

3) Turn it back on - Turn on main first and then all of the little ones.

~Preventative maintenance things to do around your home~
1) Change washer/toilet (underneath) lines to stainless steel graded lines (approximately $30 at home depot). Will more likely prevent hoses from rupturing and water damage.
2) Home hazard hunt. See what you can clean up.

3) Dump hazardous wastes at hazardous round ups.

4) Check your insurance coverage

~Classes to take~
1) CPR/First aid

2) Fire extinguisher

~Other Disaster Notes~
If wires land on your car. Stay in your car until it becomes a life threatening situation. If you can't wait. Open your door. Turn sideways in your car with both feet inside, place feet on car sideboard and jump with both feet out, key is to land with both feet at the same time so you are creating a circuit between the car and the floor. Then duck walk (sliding walk without lifting your feet) so you don't draw a charge.

Tsunami- go 50 miles inland and highest elevation possible.

Tornado- interior room on lowest level of building away from windows. Bathroom center of house.

Tuesday, October 24, 2017

DIY Cup Noodles Halloween Costume


diy halloween baby costume
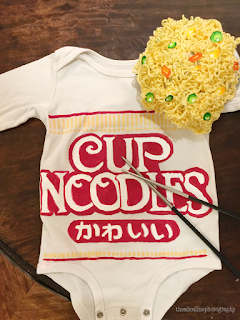
How yummy is my little cup noodles? :) Here are the steps to make your own DIY cup noodles costume. See steps for the onesie and the process photos below. Feel free to comment with any questions! Happy DIY-ing!
Materials: 
~White onesie
~White beanie (you can see here, ours has gray stripes)
~red, yellow and white fabric paint/paintbrush
~yellow yarn
~paper/markers to draw carrots and peas
~chopsticks optional
~hot glue gun
~skewer
~cardboard (to put inside the onesie while you are painting)


diy halloween baby costume
Cup Noodles Onesie
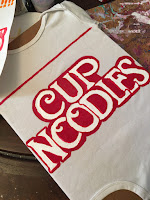
Step 1: Put the cardboard into the onesie so that the paint doesn't seep through to the back when you paint the front.
Step 2: Sketch the words onto the onesie with pencil. 
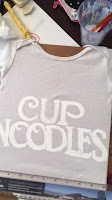
Step 3: Paint Cup noodles on the onesie with white paint.
Step 4: Paint the japanese words. The japanese words i used was "cute noodles"
Step 5: If you would like, you can sew on a fabric (old tshirt or pillowcase cut up) on the inside of the onesie because the paint makes it a little hard.
Step 6: Bake the onesie to set the paint (I did not do this therefore, the paint ran when i put it in the wash).


diy halloween baby costumeCup Noodles Hat
Step 1: Wet skewer under water.
Step 2: Wrap the yarn around and around the wet skewer.
Step 3: Wet the yarn.
Step 4: Microwave the skewer/yarn
Step 5: Unravel yarn and wha-la, you have some curly noodles
Step 6: Repeat until you have the desired amount of noodles for the beanie. I think I did 7 skewers.
Step 7: Hot glue the noodles to the hat
Step 8: Draw peas and carrots
Step 9: Hot glue peas and carrots to hat.


diy halloween baby costumediy halloween baby costume


diy halloween baby costumediy halloween baby costumediy halloween baby costume


diy halloween baby costumediy halloween baby costume


diy halloween baby costume


diy halloween baby costume


Thursday, October 5, 2017

Lavender and aqua bunny theme baby shower


Theme: Lavender/aqua/grey bunny theme
Occasion: Baby Girl Baby Shower
Styled by: Ruby, Heidee, Leslie, Charmy, Rosa & Alice
Calligraphy and Dream Art by: 
thealicelineart

Location: Mary Lane Cafe, Pasadena, California

Hi everyone! Wanted to share a bunny themed baby shower my friends and I put together for our dear friend Betty over the weekend. We handmade most of the items in the photo including: the bunny banner, pom pom mobile, pom pom wands for the table, watercolor wash place cards, menu, and dream art and the cake decorations, a 1-10 fruits book for the baby and games (not pictured). We loved the way it turned out and wanted to share the photos with you. 

Mary Lane Cafe baked the triple berry cake. We decorated with lavender roses, white hydrangeas, white roses and other little flowers (lavender flowers from a florist and the other flowers from Trader Joes. The bunny ears are made out of a total of 8 lavender/magenta pipe cleaners: two pipe cleaners twisted together for each side, so easy and pretty!


Pom pom mobile - materials used - yarn, light aqua, teal, dark purple, lavender tulle, sewing wood ring wrapped in ribbon and braided yarn to hang the mobile. There are lots of pom pom tutorials out there and we wrapped these around 75-100 times around our iphones, vertically and horizontally to create different sizes.
For the party favors, our friend Leslie put together two different little bags with decaffeinated teas utilizing ingredients like chia seeds, goji berries, dates in one satchet and a blend of ginseng, red dates and goji berries in the other satchet. All baby bump friendly. 

The bunny banner was made of cardstock and embossed with green/teal glitter recollections and magenta ranger embossing powder and written using the ranger embossing pen and the darice tool for drying. 

dream art lettered in ecoline watercolor accented with 3 types of glitter and embossing powder for the word sea.
Calligraphy menu written with gouache ink with hunt101 nib on watercolor wash canson paper
watercolor wash placecards lettered with gouache ink and hunt101 nib


A few friends flew down from San Francisco just to celebrate our mama-to-be. :)
Florals and vintage tea cups to decorate the table, along with bunny folded napkins
Our pretty mama-to-be at 33 weeks with her cute baby bump. 

Rose lemonade was the refreshing beverage of the day. 


Our papa-to-be drove 4 hours to stop by for a surprise visit. :)

Concentrating hard on the mama and baby animal game. Much harder than anyone imagined!


Monday, September 25, 2017

my favorite baby and toddler science books

hi mamas and friends,
i am a children's book fanatic. i love buying books for my children and i love giving books for birthday and holiday gifts. one of my childhood dreams is to write and illustrate one, hopefully some day i will. since my husband is a scientist and my dad is a retired aerospace engineer, i wanted to expose my little ones to science books.

here are my some of my favorites to buy and give.

for the older toddlers, 3 and up
women in science - 50 fearless pioneers who changed the world by Rachel Ignotofsky - my four year old loves this book. we read about a scientist every night before bed. this is for older toddlers, but it's never too early to expose your daughters and sons to strong, intelligent women. highly recommend.

rosie revere, engineer by andrea beaty - a nice message in this book. you only fail if you quit. this is a little long for my toddler to sit through when she was 3 years, but i think she can probably sit through it now.  we haven't pulled this one back out in awhile since we rotate our books.

ada twist, scientist by andrea beaty -  I bought this one but haven't taken it out yet. Will probably gift this to my daughter for xmas this year.

i am jane goodall by brad meltzer -  we also read about jane goodall in the women in science just last night. she wasn't a traditional scientist, but she worked and lived with the chimpanzees to study them. my kids are fascinated by animals.

i am albert einstein by brad meltzer - brad meltzer has a whole series of books about inspiring heroes. albert einstein is one of them. he was a dreamer that thought in pictures instead of words. he went on to become one of the greatest scientists in history.

the girl who thought in pictures: the story of dr. temple grandin by Julia Finley Mosca - i have not yet read this book but it looks promising. its about a girl diagnosed with autism who became a scientist.

for younger tots:
baby loves aerospace engineering by ruth spiro: was so excited to discover this book since my dad is a retired aerospace engineer. my toddler loves this book, especially the birds and the rockets. he enjoys reading it and flapping his "wings".

baby loves quarks by ruth spiro: we have this one too. you learn about quarks, protons, electrons and atoms and molecules.

quantum physics for babies by chris ferrie - my daughter loved this book when she was very little. she learned about protons and neutrons and electrons. we should probably rotate it back into our current reads again to see how they like it now.

not science related but math:
introductory calculus for infants by Omi M. Inouye this is a fun book for any math lover. 

Hope you enjoy this list. Let me know if you have any other favorites.

Cheers,
~Alice

Thursday, September 21, 2017

The Ultimate Baby Essentials List Continued: Feeding Essentials

~Feeding Essentials~

Feeding typically starts between 4-6 months. But you can go ahead and register for these items when you are setting up your baby registry. :) 

~High chairs~

Feeding chair: We have the stokke tripp trapp – we like it. Emerson started sitting in it (with the baby seat) around 5 months and still sits in now with the baby seat at 21 months. When he's older, we can remove the baby seat and they can sit in it like a chair. 


Summer infant booster seat - we have this at my parents house (hand me down) and it was handy as well. It has a nice large tray and it's easy to clean and attach to the chair. 

Prince lionheart bebepod - we have this too and it worked well for melody but if your baby is on the chubbier side, it might not work as well. This is also easy to clean and easy to attach to a chair

~Bottle warmer and travel mug~

Zojirushi hot water dispenser - we loved using this instead of a bottle warmer necessary. It is so versatile - we use it for everything - including hot water, tea, instant coffee, instant noodles, and for warming the bottles. We would fill a big cup or bowl or mug with hot water and then put the bottle in it to warm. if you are on the go, you can store the water in this stainless steel drink holder as it stays warm for hours.

Zojirushi stainless steel drink holder that keeps milk cold or water hot for hours. we use this on day trips when melody need to drink milk. or to carry hot water when you want to warm the bottle. 

~Popsicle and ice cube molds~
Zoku mini pops mold - this is great for breast milk pops, milk pops, water pops with fruit, yogurt pops with fruit, the possibility are endless and the size is perfect for the little ones. they are perfect for a hot day and perfect for when you littles have fevers. 

Zoku quick pops mold - this is awesome for homemade popsicles. you can make them in under 10 minutes. awesome for the little kids as you know exactly what you are putting in them. and my daughter loves helping to make her own ice pops too. 

Ice cube molds - we have an array of fun ice cube molds. these are great for when you have hot soup, or want to make things a little more fun. we freeze water in them. I prefer the silicone ones as they are easier to pop ice cubes out.

~Bibs and baby bandanas~

We have found that the silicone bibs work best: I love the Make My Day silicone bibs. They work well, easy to roll up in your backpack, are easy to wash (don't smell after use) and are super cute too. if you use it in the stroller, you could actually store some snacks (like strawberries, or bunny crackers, etc.) in the bib pocket for them to eat themselves.
breakfast at tiffany's style bib - This is my favorite bib for girls - my four year old still wears it to eat when she wears nicer clothing or eats ice cream or messier foods)
tuxedo bib - this is my favorite one for boys . 

Bumkins baby bibs - we have a few of these as well. they work well and too but because they are soft, they don't catch as much of the food as the Make My Day bibs. We also noticed after awhile, they start to smell a bit. They do have some cute designs though. 

Bandanas - these are great for drooling babies or to wipe runny noses and they look really cute too. 

~Pacifier ~

 Wubbanub – this would have been a lifesaver for m. I can’t tell you how many times in the middle of the night we had to find a pacifier and couldn’t find it. But em never used it even though we got it for him. So many cute animals to choose from:

~Pouches and feeding accessories~

Plum organics - prunes - unfortunately constipation is common, so we always have prune pouches on hand to provide to my 21 month old once a week. He's been eating these since 8 months. 

Chubchub pouch buddy - perfect to stick on top of your pouches to prevent spills. 

Munchkin snack catcher - great for car rides. We put cheerios, fruits, bunny crackers, etc. 

~Placemats~

Shutterfly has cute placemats if you want to add your own photos. They sometimes have free deals and you just pay for shipping.

I have seen those non-slip placemats plates but i haven't tried any. 

Modern-twist coloring placemat - we have this as well and it's a good placemat and is easy to wash. our markers dried out rather quickly though, but my kids like it even without coloring on it. only bad thing is that my toddler sometimes throws the whole thing on the floor.  

For restaurants, we love using disposable placemats. they don't always stick to the table super well, but most of the time, they work. We still wipe the table down but we also put a placemat on top. This way when the kids drop the food on the table, they can pick it back up and eat it. 
Minnie mouse disposable placemat
Winnie the pooh disposable placemat
Hello Kitty disposable placemat
Construction disposable placemat - we are currently using these. they are thicker than the Disney ones. 

~Teeth Brushing~

We started brushing our babies gums with gauze after nursing at night. They didn't always like it but we tried our best. After they got a little older, we started with the baby banana brush. 
You can start this around 4-6 months to get your babies used to having their gums brushed.
We loved the baby banana infant brush - this was easy and soft for my infant to use and started getting him used to brushing his teeth.

Radius toothbrush for toddlers - when they are a little older. i like these brushes because they are soft bristles so its easier to brush around the little teeth. 

For other nursing/bottle essentials, please reference my previous post here

Hope this helps! Feel free to comment on any essentials you would recommend.

Cheers,
~Alice


Monday, September 18, 2017

Dear Daughter - Letter to first born prior to sibling being born - by Jenny Studenroth (littleknotheads)

Hi all,
Happy Monday.

Wanted to share a blog post by littleknotheads I read recently that brought tears to my eyes. So many words reverberated with me, especially when I think back to being pregnant with my second child. This is a letter from the mama to her first born daughter before her second daughter was born.

Here are a few excepts:

"As you climb up into my lap these days, barely able to fit on the disappointing amount of thigh space the baby bump leaves you, I am achingly aware that our time is running out. Your dad and I are so excited to be growing a family and giving you the sibling you so need and deserve, but the transition won’t be easy. Especially for you. . . . It’s hard to believe in mere weeks, you’ll be the big sister."

I remember the last few months of pregnancy and thinking, we are now going to have to split our time and our precious daughter will not have our full 100% attention anymore. I felt so sad about this and definitely tried to make the most of our time together - mommy and daughter ice cream dates and art projects and going on whatever weekend adventures we could. We even did Disneyland again a few days before Emerson was born. :)

"I want you to know how special this time has been with just us two. We’ve taken adventures together that I will remember all my life. I doubt much of these couple years will surface in your own memories as you grow, but that’s why I take so many pictures. And I will remind you over the years."

I am guilty of taking too many pictures, but I can't say enough about taking more videos. Your little ones change so much, particularly their little voices. I want to always remember what my 1.5 year old melody sounded like, vs 2, vs. 2.5 years. I enjoy going back to these videos so much and it brings me so much joy to be able to relive these adorable moments. I also love looking back to Melody at Emerson's age currently to hear what she sounded like and oftentimes, they said things almost exactly the same. Makes your heart melt for sure. 

"Your sibling(s) will look up to you for your strength and fearlessness, and I will always look back on our first two-plus years as such an intensely joyful learning experience."

For us, it is your sibling, not siblings ;), but I know that Emerson will always look up to his big sister for her strength, character and guidance. She is such an amazing, awesome and caring big sister. 

Please go and read Jenny's whole letter here. It's a good one. 
Cheers,


~Alice

Friday, September 15, 2017

How to select a pediatrician for your new baby

As a first time parent, 4 years ago, we did extensive research on selecting a pediatrician for our baby.

We were provided a list of pediatricians from my ob/gyn. From there, I called each office and asked some basic questions.

1) Is there someone who can answer your medical questions 24/7 via phone or email? And is this service free of charge? And is there a limit on how many times you can call? Our pediatrician office fields calls after hours and if it's urgent and you need a call back immediately, they will get back to you within 1 hour. If it is less urgent, they will call you back within a few hours. At any time of day. For no additional charge. I can't tell you how helpful this was in the first year for both my babies. We had questions about fevers, coughs, rashes, hives, uti's, etc.

2) Is there a separate sick baby entrance from the well baby entrance? This is important because kids you don't want to take your child to the pediatricians office only to have them fall ill from another child in the waiting room.

3) Do they accept your insurance? Are they accepting new patients?

4) Is there parking? Do you validate?

5) Do they offer same day appointments if your child is ill? Do they offer weekend appointments? If not, is there an urgent care nearby they would recommend? We have found that seeing our own pediatrician or a pediatrician in the same practice/office has been more valuable than going to urgent care. The last few times at urgent care, we saw a medical assistant, which I felt wasn't as helpful or as insightful as our own pediatrician's office.

6) Where did the pediatrician go to school and where did they do their training? Is the pediatrician a parent? How long has the pediatrician been practicing? How many pediatricians are in the office?

7) How far is the office from where you live?

8) Are they affiliated with the hospital you are delivering at? If not, you can alway still see this pediatrician and see the attending pediatrician at the hospital when you deliver. What hospital are they affiliated with?

9) If the phone call is to your satisfaction and all of your criteria is checked off, then schedule an in person interview and see how you feel when you meet the pediatrician in person. Do you prefer someone that is more warm and fuzzy, or someone that is to the point?

10) Are the office staff nice and helpful?

Hope this helps! Feel free to reach out if you have any questions!


Thursday, September 14, 2017

The Ultimate Baby Items Guide: Nursing essentials for the new mama

Hi there! Thank you for stopping by.
Here are my tips for some mama/nursing essentials including bottle feeding.
Pre-baby:
Take a breastfeeding class - if you only take one class, take this one. We took our class at the Pump Station. I also recommend infant CPR, we took this class at the local hospital.
Pump: call insurance to get your pump prior to delivering. I have seen that they are delivering them much earlier now, maybe even 2-3 months prior to the baby arriving. I used the Medela advanced pump in style, backpack and had good experiences with that. I was able to use my pump from 4 years ago as a second pump to leave at work. it was a life saver to not have to carry it back and forth everyday. If I were to do it again, I would go with the Spectra. Although I have not personally used the Spectra breast pump, many who have tried both like the Spectra better. So, if your insurance covers it, I would go with the Spectra over the Medela.
At the hospital - ask for a belly binder before you leave. this will help you tummy stay tucked and helps your belly shrink back. I wore mine 24/7 for the first 4 weeks after delivery. I did have a c-section though.
Take some silhouette photos a few days or weeks prior to delivery/due date. They are easy to do with your iphone. I used this tutorial from white house black shutters blog.
tummy butter for mommy while preggo (to reduce stretch marks) i like the smell of this one and it felt nice to rub it on my preggo belly.
Pump Parts: A few tips regarding pump parts: 
1) (Pre-baby) When you have your baby, while at the hospital - ask to pump (you will get all of the pumping parts for "free" and trust me, if you are pumping, you will want all of the extra parts you can get.
2) When pumping at work or at home, refrigerate the parts in a clean ziploc bag between pumpings at during the day. Wash at the end of the day (sometimes I didn't wash until after the 2nd day).
3) have a big bucket with dishwasher liquid water and soak your pump parts prior to washing. this will make it easier to wash. we use seventh general free and clear dishwasher liquid. i like it because it has no smell and feels clean.
For after baby arrives:
Nursing pillow – bring this to the hospital. I used the luna lullaby - it feels soft and comfy, but might be a little too soft for some and might get too hot for some, but i liked mine. I liked the luna lullaby better than my brest friend (i found this a bit a bulky and hard to maneuver) and the the boppy. this is personal preference, maybe stop by a store to try them out.
Freemie for pumping has been a lifesaver at work – use this with my medela pump and go advanced pump. it's nice to be able to slip the cups into certain shirts and pump without the flanges sticking out. sometimes i wasn't sure if i pumped less using the freemie though, but overall i was happy with this purchase. I used it for a year and 4 months.
Lansinoh nursing pads you will likely leak a lot during the first few months if you are breastfeeding. therefore nursing pads are a must. carry extras with you just in case.
Motherlove nipple cream – bring this to the hospital. apply to nipples if you feel chapped or if it hurts. this is ok for the baby to eat, you do not need to clean it off before feeding.
pumping hands free bra if you aren't using the freemie and you are pumping, you must get a hands free pumping bra. some people are able to cut slits into old sports bras and makeshift their own. i used this and it was rather easy to use.
Mother’s milk tea to help breastmilk production. this has a strong herbal taste. if you want you can add cream to it and some honey and that makes it taste a bit better.
Nursing bra – I lived in those.
Nursing tank tops - my favorite one was from muji that i got in japan. however, second favorite would be from h&m. these from amazon look comfortable but i haven't tried them. target also has a selection as well.
Cloth nursing pads – good for later on (6+ months) when you aren’t leaking so much.
Haakka  - collects milk on one breast while you nurse on the other side. I haven’t used this but I heard it works great. I didn’t know about it when I was nursing early on, otherwise I would have tried it.

dr brown bottles - lavender - we had good luck with the dr brown bottles. no gas issues for both my babies. we bought lavender bottles because i love lavender but found it was easy for the daycare to identify their bottles because they were different from everyone else's clear bottles. so, i highly recommend buying a different color bottle to easily differentiate your child's bottles for the teachers.

preemie nipples - start with preemie nipples for a slower flow so that your baby doesn't learn to prefer the bottle to nursing. also, a tip to save money would be to use a fork to poke a bigger hole in the nipple when they outgrow the preemie nipple. :)
bottle brush

bottle drying rack - we have this one and it lasted us through two kids so far. will be handing it down to a friend.

Lawn drying rack - this is the bigger one. the grass is the smaller one. we used both the bottle drying rack above and the lawn drying rack. sometimes both would be completely full of pump parts and bottles to dry.
on the go drying rack this was perfect for weekend trips or longer trips. bottle drying rack with a brush. tip: fill a medela 2.5 ounce storage container with dishwashing liquid to take with you on the go.
medela hand pump was great for on the go or for long car rides or for extended periods of time when you couldn't nurse or get to your electric pump.

hot water dispenser - highly recommend this. we use this to warm the bottles as well as to make coffee, tea, instant noodles, etc.

bottle warmer - none needed. we used the hot water dispenser to fill a cup full of hot water to warm the bottle

bottle transporter - we use the tokidoki fuel cell - i bought mine off ebay because the tokidoki site didn't have the exact print i wanted. they are super cute and they will hold three 8 ounce dr brown bottles or maybe 4? and also they hold 4 regular water bottles. we use this for disneyland or for day trips in addition to everyday at daycare.

Deep freezer to store breastmilk - we got our deep freezer from home depot and now that we ran out of breastmilk, we store our other frozen foods. it's very convenient.

Thanks for reading. Please leave any comments or questions. (please note: affiliate links are on certain links).

Best,
~Alice

Sunday, September 10, 2017

the ultimate baby items guide from a mama of 2: Part 1 - Strollers and Car seats

Hi everyone!
It's been almost 5 years since I've posted on my blog. Since then I've been busy learning to be a mama of two, one 4 year old girl and one 1.5 year old boy. I've decided to refocus my blogging efforts on my new realm of expertise - being a mama. Over the next few weeks, I will be posting my ultimate baby items guide, now that I am a mama of 2.

I am often asked to provide recommendations on my favorite baby products. Since I am the type to do extensive research and exhaust all options, I have listed here, my ultimate list of my favorite baby items. Please feel free to contact me if you have any questions.
This is an extremely long list so i will be doing this in parts. Part 1 is stroller and car seats

Some general notes.
Baby bargains is a great resource – good safety ratings and reviews.

 Reference for safety of baby toiletries/sunscreen etc. ewg.org

 Register at Amazon, Target, PB kids. They give you a completion discount
so if you do want to purchase something you didn’t get, at least you get a
discount.

Albee baby is tax free for those of us in California (located in NY). This is where we bought our stroller, car seats and other bigger items.

~Strollers~
Uppababy cruz stroller: for everyday stroller (disneyland too)
Melody is 4 and still loves to sit in it. Things we love about it besides how pretty it looks for a stroller - it's easy to fold up, has a huge basket, offers a smooth ride, has an adapter for a chicco carseat.

Uppababy vista - this is a larger stroller and offers a double stroller option. Those who want to have kids close in age often choose this one over the cruz.

Stroller accessories:
Stroller caddy for drinks – this fits great on the uppababy cruz. it's less expensive than the uppababy one. the caddy can hold two drinks although you might want to stuff some towels at the bottom because the drink pockets are very deep. it's very hard to steer stroller while holding drinks with no cupholder.

adapter for a chicco carseat - we used our uppababy cruz with the adapter for the carseat from the beginning. that way we saved money and didn't have to invest in another stroller.

piggyback skateboard - If you have a second baby, our toddler daughter loves to stand on the piggyback skateboard.

mommy hook - to hang your purse, milk bag, shopping bags, anything really. a good strong hook.

Lightweight Stroller:
Uppababy Gluxe Umbrella Stroller (lighter weight) –  – this is perfect for travelling and
side trips. It lays down pretty flat so when we took Melody to Taiwan (she was under 2), she napped very well in the stroller. It’s also lightweight and has a decent size basket for a lightweight
stroller.

Babyzen yoyo stroller - another lightweight option - haven't tried it but have heard great things.

Double strollers:
We just bought the Zoe double stroller today! So we haven't received it yet, but I will update once we start using it. We will be travelling abroad soon. This one is 16 pounds and looks rather easy to travel with and hopefully comfortable.

We have also looked at the uppababy glink but we haven't tested it out. Will need to report back on this one.

Uppababy vista also offers a double stroller option for an infant and a toddler.

~Car seat~
chicco keyfit 30 not convertible. You will get a convertible later. this is rated high for safety (baby bargains book) and it’s adaptable for the cruz stroller.
Go to local firestation and have them check your installation. Middle seat in the back is safest.

uppababy mesa - a lot of people like this car seat. I already had the chicco keyfit but otherwise I would likley have gone with this one.

~Convertible car seat~

Chicco nextfit we like. Straps are a bit easier to adjust. We also have maxi cosi 85 but we like the nextfit and the peg perego more.

We also have the peg perego viaggio – my 4 year old can now buckle herself in this carseat, so i like it much more. the straps, once you set it, are generally pretty easy to adjust and they don't get to twisted.

Alright, going to sleep while my babies sleep.

Let me know if there is any topics you would like me to post about first.

Will post more soon.
Cheers,
~Alice